EV Charger Installation Cost Vancouver: Affordable & Efficient Solutions
As electric vehicles (EVs) continue to rise in popularity, more Vancouver homeowners are looking to install EV chargers in their homes. Whether you’ve recently bought an electric car or are planning to make the switch soon, knowing the costs involved with EV charger installation can help you make an informed decision. Let’s break down the factors that influence the cost of installing an EV charger in Vancouver and why it’s a worthwhile investment.
1. Type of Charger
One of the biggest factors that will determine the cost of installation is the type of EV charger you choose. There are three primary types:
- Level 1 Chargers: These chargers typically come with the vehicle and use a standard 120-volt outlet. Installation costs are minimal, as you likely won’t need any additional wiring or equipment. However, charging times are quite slow.
- Level 2 Chargers: These require a 240-volt connection and are much faster, often charging your EV in just a few hours. Installing a Level 2 charger typically costs more, as it requires a dedicated circuit and professional installation by a licensed electrician.
- DC Fast Chargers: These are the most powerful chargers, used mainly in commercial settings. Installation costs are significantly higher, and they are generally not necessary for most residential setups.
For most Vancouver homeowners, a Level 2 charger strikes the right balance between cost and convenience. It allows for fast charging without the high expense of a commercial-grade unit.
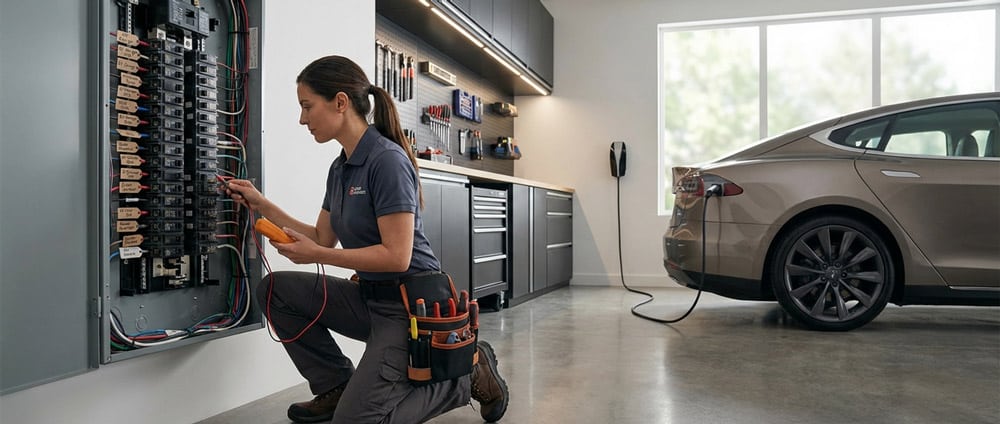
2. Electrical Panel Upgrades
In some cases, your home’s electrical panel may need an upgrade to accommodate the additional load of an EV charger. If your current panel is older or doesn’t have enough capacity, an electrician may recommend a service upgrade to ensure safe and efficient charging. The cost of upgrading an electrical panel can range from $1,500 to $3,000, depending on your home’s existing infrastructure.
3. Location of the Charger
The distance between your electrical panel and the charger’s installation point will also affect the cost. If your garage or driveway is far from the panel, more wiring and conduit will be needed. In contrast, shorter distances typically result in lower costs.
4. Permits and Inspection
In Vancouver, obtaining the necessary permits and undergoing inspection for your EV charger installation is essential to ensure that the installation complies with local safety regulations. Permit fees can vary, but you can expect to pay around $100 to $200 in most cases.
5. Labour Costs
Hiring a licensed electrician is a crucial part of ensuring your EV charger is installed safely and efficiently. Labour costs in Vancouver typically range from $75 to $150 per hour. A simple installation with minimal upgrades may take just a few hours, while more complex installations that require panel upgrades or long wiring runs could take a full day.
Average Total Cost of EV Charger Installation
For a Level 2 charger, the total cost of installation in Vancouver usually ranges from $1,000 to $2,500, depending on the factors mentioned above. This includes the cost of the charger itself, which typically runs between $500 and $1,000, as well as installation, permits, and any necessary upgrades.
Why Invest in an EV Charger?
While the upfront costs may seem significant, installing an EV charger at home offers several long-term benefits:
- Convenience: Having a charger at home allows you to charge your vehicle overnight, ensuring you’re ready to go every morning.
- Increased Home Value: As more people switch to electric vehicles, having an EV charger installed can increase the appeal of your home to potential buyers.
- Cost Savings: Charging at home is often cheaper than relying on public charging stations, especially if you take advantage of off-peak electricity rates.
Get Professional EV Charger Installation in Vancouver
If you’re ready to install an EV charger in your home, it’s essential to have the work done by professionals to ensure safety and compliance with local codes. At Trigger Electric, we specialize in EV charger installation and can help you choose the right setup for your needs. From ensuring your electrical system is up to code to installing the charger efficiently, we handle every aspect of the process.
Reach out to us today to discuss your project, or get a free quote on EV charger installation. Ready to go electric? Let us power your journey forward!
For more information, check out our dedicated EV Charger Installation page.
If you’re thinking about upgrading your home’s electrical system to support an EV charger, explore our Residential Electrical Services for complete electrical upgrades, panel servicing, and more.
EV Charger Installation Cost Vancouver: Understanding the Full Process
When planning for EV charger installation in Vancouver, it’s essential to not only consider the costs but also understand the installation process and requirements. For a detailed guide on home EV charger setups and additional resources, check out this comprehensive EV charger installation guide from BC Hydro, which covers everything from site assessment to installation and permits. This ensures your home is ready for efficient and safe EV charging.
FAQ
What is the average cost of EV charger installation in Vancouver?
The average cost for EV charger installation in Vancouver ranges from $1,000 to $2,500. This includes the cost of the charger, installation, permits, and any necessary electrical upgrades.
Do I need to upgrade my electrical panel for EV charger installation?
In some cases, an electrical panel upgrade is required if your current system doesn’t have the capacity to handle the additional load of an EV charger. This can add $1,500 to $3,000 to the overall cost.
How long does it take to install an EV charger at home?
Most EV charger installations take between 2 to 6 hours, depending on the complexity of the setup and whether any additional electrical upgrades are needed.
Are permits required for EV charger installation in Vancouver?
Yes, permits are required for EV charger installations in Vancouver to ensure compliance with local electrical codes. Permit costs usually range from $100 to $200.
What type of EV charger is best for home installation?
For most homeowners, a Level 2 charger is the best option for home installation, as it provides fast charging times and is cost-effective compared to more powerful commercial chargers.